Step by step guide on how to install SSL certificate on Nginx server
NGINX being an open source HTTP server is used by many webmasters. It also works as an IMAP/POP3 proxy server. This server is known for its high performance, constancy, generous features, and low resource utilization. It also provides a scalable and unsynchronized architecture that utilizes only little load memory. Great that you have chosen to use this server.
But in order to secure it from hackers and optimize it, you will need to buy an SSL certificate and install it.
But before we get into how to install SSL Certificate on NGINX web server, let’s first look at the checklist.
Install an SSL certificate on a NGINX server Checklist
- Ensure that you have your server certificate issued by the Certificate Authority. Most probably, it will be in your email. If you can’t find it, go to your Account Dashboard and download it.
- Check your intermediate certificates- files that enable devices that link to your server to make out the issuing CA. You may have more than one file in some cases. Usually, the certificate comes in a ZIP folder and is sometimes referred to as a CA Bundle.
- Also, check your private key, a file that you will typically find on your server. If it is not found on your server, probably you have generated your CSR from a free generator tool, and the file will be in your possession.
Unless you have all these certificates and files, you can’t proceed.
How to Install SSL Certificate on NGINX Server?
Step #1: Download both the intermediate and primary certificates
Open the “your_domain.pem” file sent by your SSL provider via email. You will find both the intermediate and primary certificates.
Download both certificate files and copy the files to the server directory. Make sure to copy the “.key file” which was created while generating CSR as well. To increase security, make them readable by root-only.
Step #2: Merge the files into a single PEM file
Merge the files into a single PEM file using the command below:
Syntax: cat domain_name.crt domain_name.ca-bundle > ssl-bundle.crt
Next, you will have to configure them into NGINX virtual host.
Step #3: Install SSL certificate in NGINX virtual host
To install an SSL certificate in NGINX virtual host, first, open NGINX virtual host.
Next, copy the “ssl-bundle.crt” file into the server location.
Locate the domain configuration file and change it. You will find the domain configuration file in /etc/nginx/sites-available/. If not, you will find it in /user/local/nginx/sites-available/.
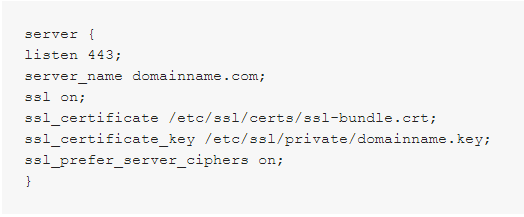
Keeping the SSL option “ON”
Set SSL port to “Listen” so that it is 443
Next, set the new “ssl-bundle.crt” file to “ssl_certificate”
And place the private key to ‘ssl_certificate_key’
Your NGINX virtual file should appear, as shown below:
Restart NGINX Server once again by following the command below:
Congratulations! You are now ready with your SSL certificate on the NGINX server.
Now you can see the green padlock on your browser if you have correctly installed the certificate.
To verify that you have successfully installed an SSL certificate on the NGINX server, use SSL checker. The tool will show your certificate details, including common name, validity, issuer, server type, and so on.
Bonus Tips
- If you are testing an SSL certificate, experts recommend not using Internet Explorer. Ensure to utilize a URL browser other than Internet Explorer as it can verify your site whether you have an intermediate certificate or not. Our guide will help you view SSL certificate in browser.
- Sometimes, you may get warnings from some URL browsers telling your site is not trusted. If such a case occurs, this means now you must install an intermediate certificate.
What are the things required for buying an SSL certificate?
Ensure that everything goes smoothly while buying an SSL certificate by:
- Having a unique website IP address
- A CSR (certificate signing request)
- An updated and accurate record of WHOIS
- Documents that validate your business (For OV SSL certificate)
Winding-Up
Website hacks are very much prevalent all over and securing your server with an SSL certificate is the only surest way to lessen the risk.
Hopefully, this guide will assist you in successfully installing an SSL Certificate on NGINX and ensure the security of your site and the safe browsing of your visitors. In case you are an ecommerce business owner, securing your site and showcasing a padlock or trust seal can gain you more customers and drive sales.
Whatever your reasons for installing an SSL certificate, it is a good move. Even Google motivates website holders to install SSL certificates on their websites. Buy an SSL certificate from ClickSSL and safeguard your data online. Don’t make it easy for hackers to compromise your site.
Related Post:


