Learn step by step about how to install an SSL certificate on a WordPress website.
Installing an SSL certificate on a WordPress website is more important than ever for WordPress website security. Let us show you how to install it quickly and easily.
But if you don’t install it correctly, you will be coming across SSL certificate errors that will deter you from having a seamless browsing experience. You will also be unable to provide security to your visitors, which is the main motive for installing a WordPress SSL certificate.
Moreover, if warning signs are displayed, it may turn away your visitors, and you may end up losing potential customers.
To help you out, let’s have a look at the different methods of installing SSL certificates for WordPress sites .
Remember that you are not actually installing the certificate on WordPress. You are installing it on the servers that host the website.
How to Install SSL Certificate on WordPress Website?
Below is the step-by-step guide to install SSL certificate on WordPress.
#1. Choosing the right SSL Certificate for WordPress
Before you buy an SSL certificate, you will have to consider certain things.
What is the trust level required? Though all the SSLs can encrypt data, the level of identity information that comes with the certificate and how they will show in your browser differ. If you require high trust, go for Extended Validation (EV) SSL. Otherwise, you can opt for Organization Validated (OV) or Domain Validated (DV).
Also, consider the number of subdomains you would like the SSL to protect. A single domain certificate, as its name suggests, will protect only one subdomain. If you want to safeguard multiple domains and their subdomains, a Multi-domain wildcard Certificate is suggested. It will save both costs and certificate management pains.
#2. Generating the CSR
Supposing you are using cPanel, the most commonly used platform, first to create the CSR,
Browse ‘Security section’ >> ‘SSL/TLS Manager’ option.
Locate the Certificate Signing Requests and under it, find ‘Generate, view, or delete SSL certificate signing’ requests.
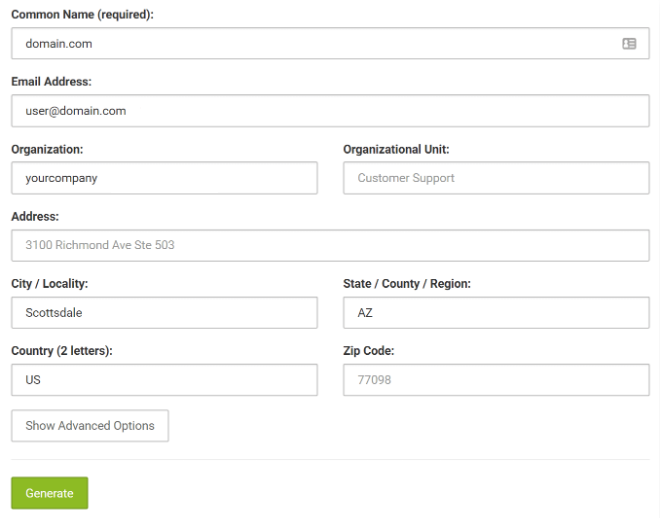
It is recommended to fill out all the fields. If you are not willing to fill out everything, enter your Common name (domain name), Email Address, Organization, City / Locality, State / County / Region, and Country.
Remember to use alphanumeric characters while filling the fields.
Click on Generate.
You can have your private keys and public keys.
The CA will ask you to send them the public key along with other required details.
After the CA receives them, they will assess your details against the type of validation you are seeking. You will be required to carry out some steps to establish your domain ownership.
You will get your SSL certificate once the validation process is conducted. Be prepared to receive emails of the files that you will use during the installation process.
#3. Installing SSL on WordPress
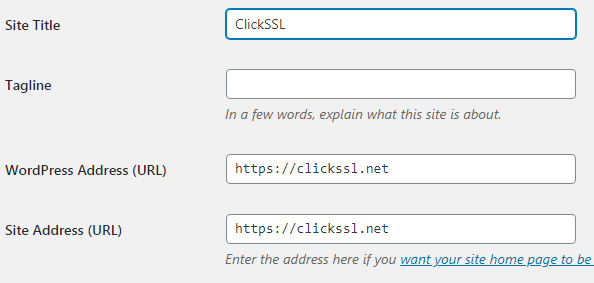
To install SSL certificate on WordPress, first, go to Settings in your WP dashboard (under General) and change the URL from HTTP to HTTPS.
In case you are trying to install a WordPress SSL certificate to an existing website, you will be required to redirect all the pages from HTTP to HTTPS. Done incorrectly, it will negatively affect your SEO rankings.
To redirect your existing pages to HTTPS, you have to bring your .htaccess file up to date. Follow the procedure below:
RewriteEngine On
RewriteCond %{SERVER_PORT} 80
RewriteRule ^(.*)$ https://www.yoursite.com/$1 [R,L]
Or else, if you have Nginx servers, follow the procedure below:
server {
listen 80;
server_name yoursite.com www.yoursite.com;
return 301 https://yoursite.com$request_uri;
}
You have successfully enabled SSL in your WordPress site.
#4. Installing an SSL Certificate on WordPress using a plugin
The simplest way to install SSL certificate WordPress is by using a plugin.
You can try the ‘Really Simple SSL’ plugin, which is available for free.
Go to plugins and navigate to ‘Add New’ in the WordPress backend. Find Really Simple SSL and set it up.
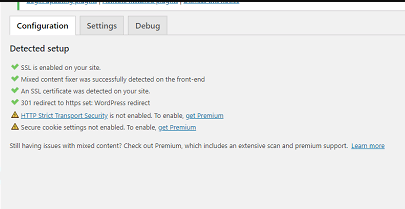
After the activation process, go to Settings and then navigate to SSL. You can now view the current status and notice if there is any fault in the main window.
The plugin does all the work of configuring. So you don’t have to make additional work. Please back up your website. Once the activation process is complete, your site will automatically develop into an HTTPS domain.
The plugin will check for an SSL certificate. After verification, your plugin will force WordPress to load HTTPS rather than HTTP. It will set redirects from HTTP webpages. The webpages still loading with HTTP will be corrected.
Ensure to activate your plugin and keep it on at all times. If you deactivate your plugin, mixed content errors will occur.
There are some features that you can avail of only when you upgrade to the premium edition, but the free version of the Really Simple SSL plugin is enough for implementing the SSL, resolving mixed content errors, and tackling the 301 redirects from HTTP to HTTPS.
WordPress SSL Troubleshooting Tips
Encountering Mix Content Warning in WordPress is common. It occurs when all the images, pages, videos, or scripts don’t load over HTTPS when you switch from HTTP to HTTPS.
By using plugins such as Better Search Replace, you can resolve the issue.
Find the Search/Replace tab and replace your HTTP domain with the HTTPS domain, as shown in the image below.
Next, click on the ‘Run Search/Replace’ option. After that, your reference HTTP URLs will be replaced with HTTPS.
You can also change the coding manually and update the links, but it will be too time-consuming.
Wrapping-Up
As you can see, WordPress SSL certificate installation is not that hard. You have to follow the simple procedures listed above. If installed incorrectly, you will encounter errors while accessing your site’s pages.
Installing an SSL is highly recommended as it provides the highest form of security. And if you manage a business site, it will also help boost your traffic and retain them, garner your customer trust, and increase sales. Implementing SSL is also known to increase SEO rankings in search engines.
So, you have nothing to lose and so much to gain by installing an SSL on your WordPress website.
Related Post:


